mailgun
mailgunにアクセスし、アカウントを取得します。

DomainsからAdd New Domainボタンを押し、ドメインの登録を行います。 指示に従い、お使いのDNSサーバにエントリを追加しておきます。
また、アカウント設定から、クレジットカードの登録をしてConcept Planに昇格させておかないと、 メールが送れず困るので登録を忘れずに。 Concept Planの場合、10,000emails/monthまで無料です。それ以上の場合に有料となります。 詳細はサイトでご確認ください。

Domainsページから、登録したドメインを選択し、設定をメモします。 SMTP Hostname, Default SMTP LoginとDefault Passwordが後で必要になります。
Google Cloud Storage
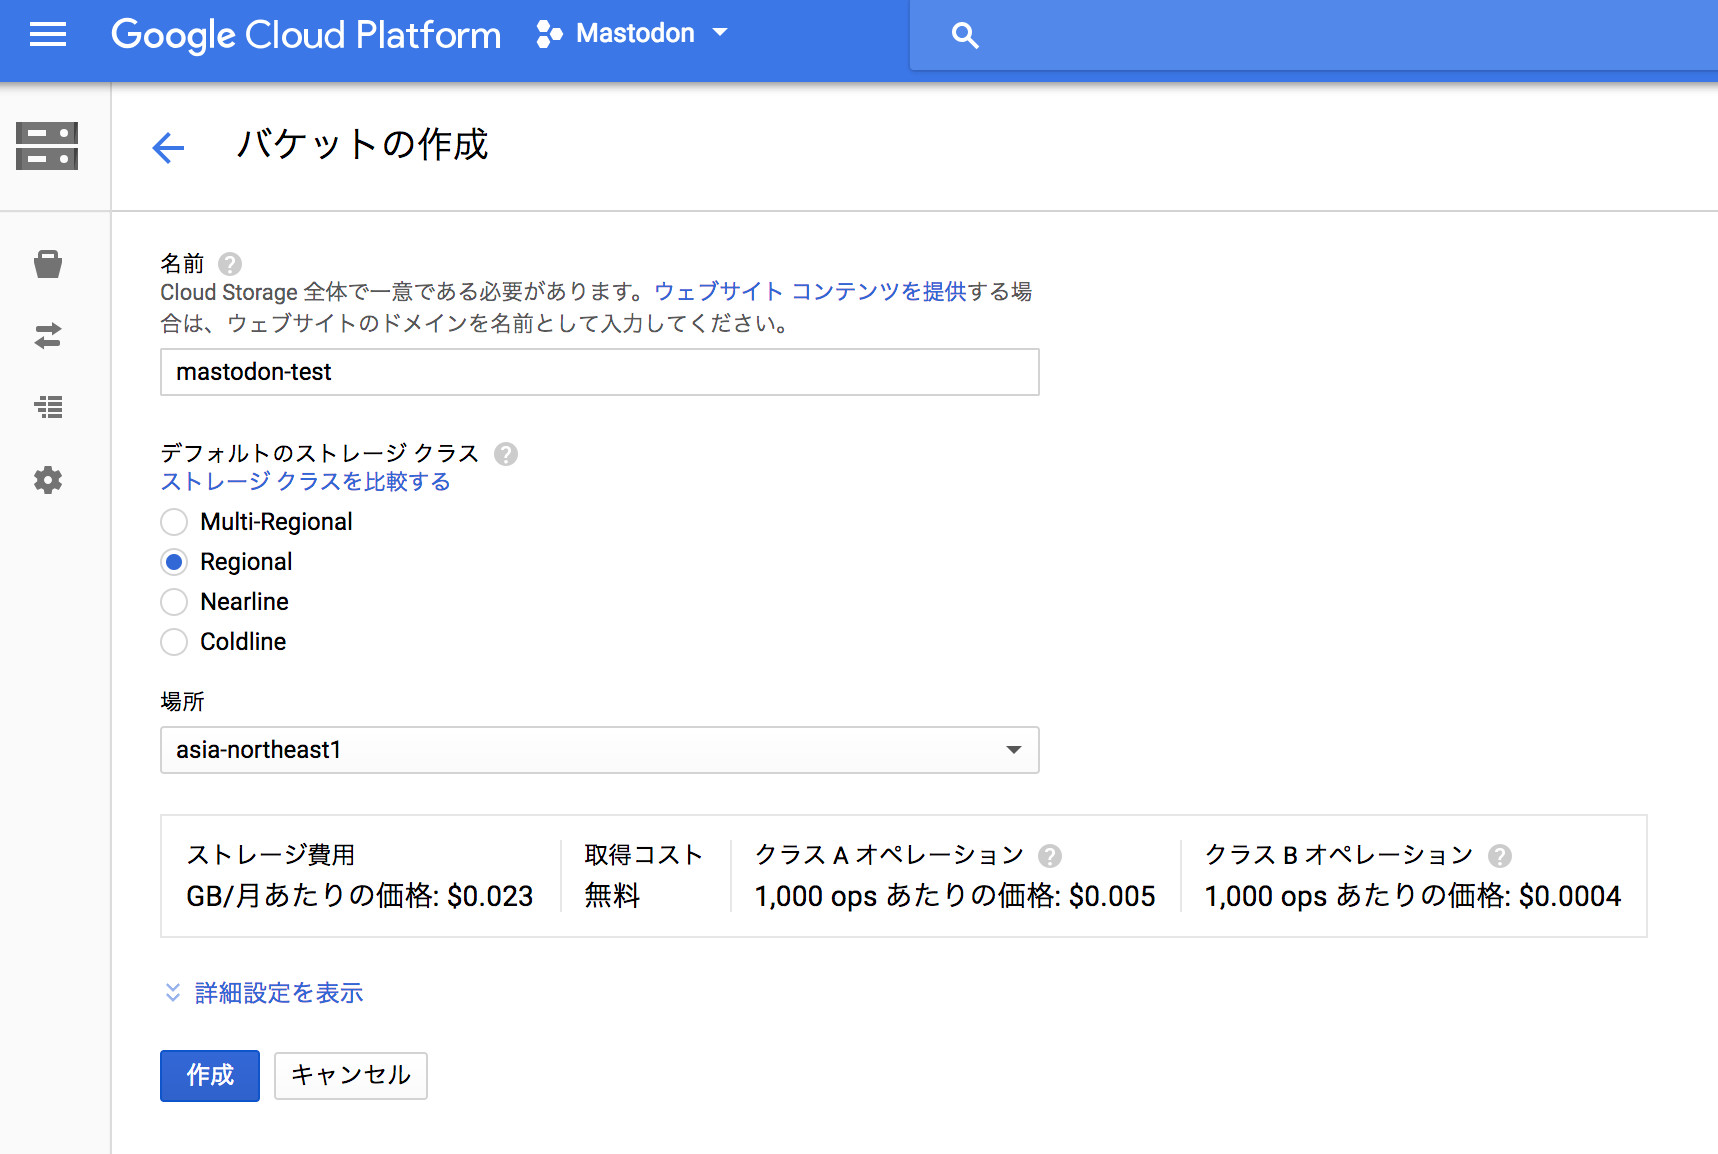
Google Cloud Storage にアクセスし、バケットを作っておきます。

ここでは、名前を"mastodon"、Regionalを指定し、ロケーションは後でサーバーを立てるリージョンを指定します。

左の設定ボタンを押し、相互運用性タブの、"新しいキーを作成"を押してアクセスキーを作成します。 アクセスキーとシークレットが後で必要になりますのでメモしておきます。
Google Cloud SQL
Google Cloud SQL にアクセスし、インスタンスを作成しておきます。

インスタンスの作成を押すと、データベースエンジンの選択画面が出るので、PostgreSQLを選択します。

次にインスタンスIDを適当に決め、リージョンをサーバーを立てるところに指定しておきます。 デフォルトのユーザーパスワードは、生成を押してランダムに作成しメモしておきます。

設定オプションを表示のリンクを開くと、マシンタイプ等を設定できます。

マシンタイプとストレージの設定を開き、コア数のスライドバーを一番左から さらに左に動かすともっと小さいプランに変更できます。

マシンタイプは最小の1vCPU, 3.75GBの下のdb-pg-f1-micro(共有CPU, RAM:0.6GB)で十分です。 その他はデフォルトのままでよいです。作成ボタンを押しデータベースを作成します。
Google Compute Engine(GCE)
-
インスタンスの作成
Google Compute Engineにアクセスし、インスタンスを作成します。


- マシンタイプは1vCPU, 3.75GBで十分です。
- 構築時はマシンパワーがかなり要るのでmicroなどにはせず、 後ほど切り替えるのがよいと思われます。
- ここで説明する構成の場合、ブートディスクは、Debian GNU/Linux 9 (stretch)の10GBで足ります。 Google Cloud Storageにデータを保存しない場合は、 /homeに別途ディスクを大きく割り当てる必要があります。 pawoo.netの多数のアカウントをリモートフォローした場合、 全盛期で1日に3Gくらい増えたりしたので、 メディアを溜め込むことを計画しているのであれば、 ローカルディスクではなく拡張が容易な、Amazon S3やGoogle Cloud Storageに飛ばすのをおすすめします。
- ネットワーキングから、外部IPを選択し、新しい静的IPアドレスを選択し確保します。
- ファイアウォールはHTTP/HTTPSを許可します。
- 必要でしたら、SSH認証鍵からお使いの鍵を登録しておきます。
-
DNSの設定
確保した外部IPに向けて、DNSのAレコードを設定しておきます。
-
サーバーへの接続
サーバが立ち上がったら、設定したホスト名でssh接続します。
-
node.jsレポジトリの追加
node.jsの必要なバージョンが取得できるように、レポジトリを追加します。
$ sudo apt -y install curl $ curl -sL https://deb.nodesource.com/setup_6.x | sudo bash - -
Yarnレポジトリの追加
Mastodonで使用しているYarnのバージョンが取得できるように、レポジトリを追加します。
$ curl -sS https://dl.yarnpkg.com/debian/pubkey.gpg | sudo apt-key add -
$ echo "deb https://dl.yarnpkg.com/debian/ stable main" | sudo tee /etc/apt/sources.list.d/yarn.list
$ sudo apt update
apt updateで更新が見つかった場合は、適用しておきます。
$ sudo apt upgrade -
依存パッケージの導入
システム全体で必要とされる、Yarnを含む依存パッケージを導入します。
$ sudo apt install imagemagick ffmpeg libpq-dev libxml2-dev libxslt1-dev file git-core g++
libprotobuf-dev protobuf-compiler pkg-config nodejs gcc autoconf bison build-essential
libssl-dev libyaml-dev libreadline6-dev zlib1g-dev libncurses5-dev libffi-dev libgdbm3
libgdbm-dev nginx redis-server redis-tools postgresql postgresql-contrib letsencrypt
yarn libidn11-dev libicu-dev
一気にシェルに渡す場合は、改行なしに一行で渡してください
-
mastodonアカウントの設定
非rootのユーザーでサービスを動かすため、mastodonユーザーを作成します。
$ sudo adduser mastodon -
非rootユーザでの環境の整備
mastodonユーザー環境下でさらにパッケージを導入します。
$ sudo su - mastodonまずmastodonユーザでログインします。
(mastodon)$ git clone https://github.com/rbenv/rbenv.git ~/.rbenv
(mastodon)$ cd ~/.rbenv && src/configure && make -C src
(mastodon)$ echo 'export PATH="$HOME/.rbenv/bin:$PATH"' >> ~/.bashrc
(mastodon)$ echo 'eval "$(rbenv init -)"' >> ~/.bashrc
(mastodon)$ exit
環境変数を反映するため、一旦ログアウトし、再度mastodonユーザでログインします。
$ sudo su - mastodon
(mastodon)$ type rbenv
(mastodon)$ git clone https://github.com/rbenv/ruby-build.git ~/.rbenv/plugins/ruby-build
Mastodonで必要とされるRubyのバージョンを指定してインストールします。
(mastodon)$ rbenv install 2.5.1
(mastodon)$ rbenv global 2.5.1
コンパイルに少々時間がかかります。コーヒーでもどうぞ。
-
Mastodonソースの取得と依存パッケージの導入
Mastodonのソースをクローンし、 必要とされているRubyとnode.jsの依存パッケージをインストールします。
(mastodon)$ cd ~
(mastodon)$ git clone https://github.com/tootsuite/mastodon.git live
(mastodon)$ cd ~/live
Mastodonの最新の安定版をチェックアウトします。
(mastodon)$ git checkout $(git tag -l | grep -v 'rc[0-9]*$' | sort -V | tail -n 1)もっと最新がよい場合はrcつきのtagを指定します。 2018/05/23 時点でv2.4.0が最新です。 masterはよく壊れるので、tagがつくまで待ちましょう。
(mastodon)$ git tag
(mastodon)$ git checkout v2.4.0
必要な依存パッケージをインストールします。
(mastodon)$ gem install bundler
(mastodon)$ bundle install -j$(getconf _NPROCESSORS_ONLN) --deployment --without development test
(mastodon)$ yarn install --pure-lockfile
(mastodon)$ exit
この後rootの作業があるので、一旦mastodonアカウントをログアウトします。
-
PostgreSQLの停止
Google Cloud SQLを用いるので、ローカルで走っているpostgresqlは必要ないので止めます。
$ sudo systemctl stop postgresql.service $ sudo systemctl disable postgresql.service -
SQLサーバの設定
Google Cloud SQLにアクセスし、先程作成したインスタンスを開きます。

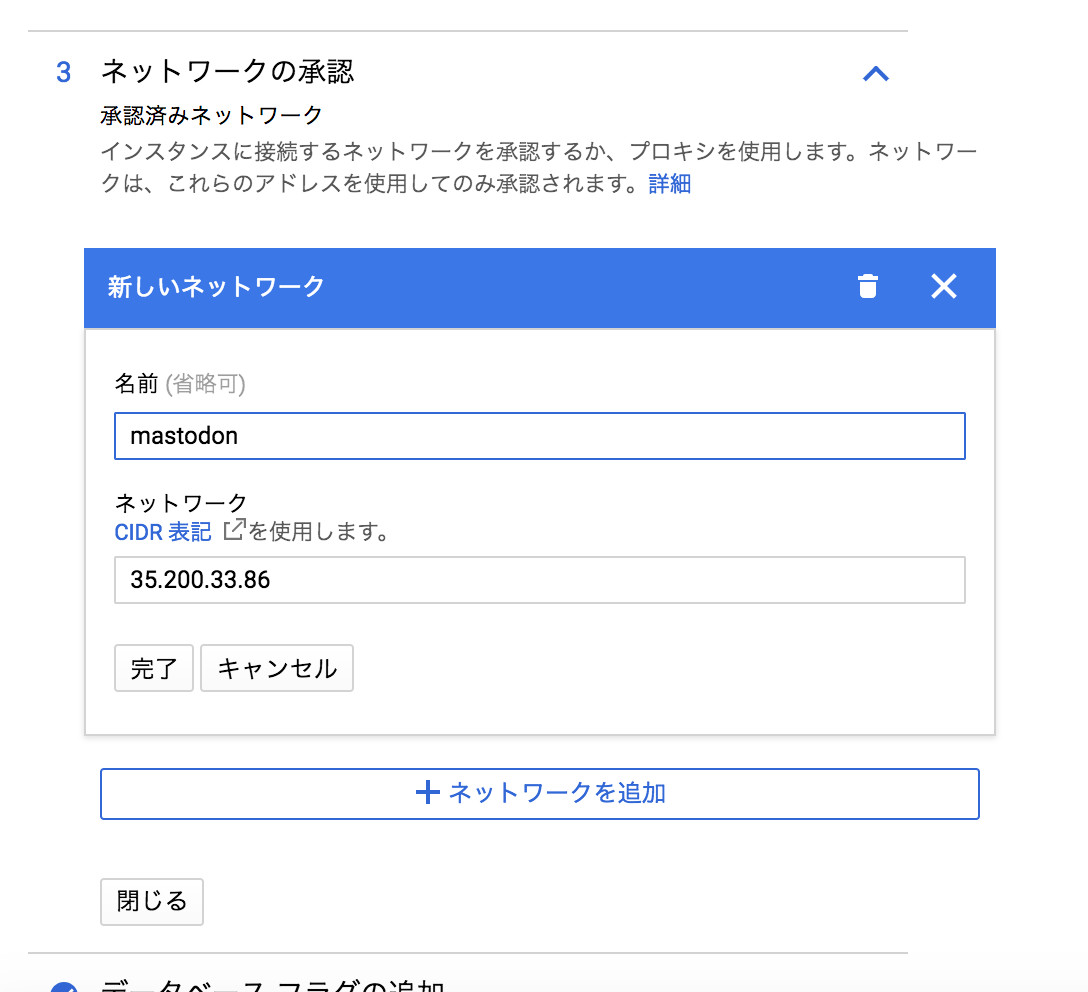
編集をクリックし、ネットワークの承認の欄を開きます。

ネットワークの追加から、Google Compute Engineで作成したインスタンスの外部IPを登録します。

最後に保存を押してセーブします。 セーブできない場合は、勝手にマシンタイプを大きくされているので元に戻しておきます。
-
SQLサーバへの接続確認
SQLに接続できるか確認します。
$ psql -h (SQLサーバのIPアドレス) -U postgres
Password for user postgres:(設定したpostgresユーザパスワード)
psql (9.6.7, server 9.6.6)
SSL connection (protocol: TLSv1.2, cipher: ECDHE-RSA-AES128-GCM-SHA256, bits: 128, compression: off)
Type "help" for help.

postgres=> \q
SQLインスタンスのIP4アドレスを指定して接続します。パスワードは先程メモしておいたものを入力します。 接続できれば、\qを入力して終了します。
-
nginxの設定
nginxの環境構築を行います。example.comとある場所は、 ご自分のドメインに置き換えてください。
$ sudo vi /etc/nginx/sites-available/example.com.conf/etc/nginx/sites-available の下に、example.com.conf という名前のファイルを以下の内容で作成します。
map $http_upgrade $connection_upgrade {
  default upgrade;
  ''      close;
}

server {
  listen 80;
  listen [::]:80;
  server_name example.com;
  root /home/mastodon/live/public;
  # Useful for Let's Encrypt
  location /.well-known/acme-challenge/ { allow all; }
  location / { return 301 https://$host$request_uri; }
}

server {
  listen 443 ssl http2;
  listen [::]:443 ssl http2;
  server_name example.com;

  ssl_protocols TLSv1.2;
  ssl_ciphers HIGH:!MEDIUM:!LOW:!aNULL:!NULL:!SHA;
  ssl_prefer_server_ciphers on;
  ssl_session_cache shared:SSL:10m;

  ssl_certificate     /etc/letsencrypt/live/example.com/fullchain.pem;
  ssl_certificate_key /etc/letsencrypt/live/example.com/privkey.pem;

  keepalive_timeout    70;
  sendfile             on;
  client_max_body_size 8m;

  root /home/mastodon/live/public;

  gzip on;
  gzip_disable "msie6";
  gzip_vary on;
  gzip_proxied any;
  gzip_comp_level 6;
  gzip_buffers 16 8k;
  gzip_http_version 1.1;
  gzip_types text/plain text/css application/json application/javascript text/xml application/xml application/xml+rss text/javascript;

  add_header Strict-Transport-Security "max-age=31536000";

  location / {
    try_files $uri @proxy;
  }

  location ~ ^/(emoji|packs|system/accounts/avatars|system/media_attachments/files) {
    add_header Cache-Control "public, max-age=31536000, immutable";
    try_files $uri @proxy;
  }

  location /sw.js {
    add_header Cache-Control "public, max-age=0";
    try_files $uri @proxy;
  }

  location @proxy {
    proxy_set_header Host $host;
    proxy_set_header X-Real-IP $remote_addr;
    proxy_set_header X-Forwarded-For $proxy_add_x_forwarded_for;
    proxy_set_header X-Forwarded-Proto https;
    proxy_set_header Proxy "";
    proxy_pass_header Server;

    proxy_pass http://127.0.0.1:3000;
    proxy_buffering off;
    proxy_redirect off;
    proxy_http_version 1.1;
    proxy_set_header Upgrade $http_upgrade;
    proxy_set_header Connection $connection_upgrade;

    tcp_nodelay on;
  }

  location /api/v1/streaming {
    proxy_set_header Host $host;
    proxy_set_header X-Real-IP $remote_addr;
    proxy_set_header X-Forwarded-For $proxy_add_x_forwarded_for;
    proxy_set_header X-Forwarded-Proto https;
    proxy_set_header Proxy "";

    proxy_pass http://127.0.0.1:4000;
    proxy_buffering off;
    proxy_redirect off;
    proxy_http_version 1.1;
    proxy_set_header Upgrade $http_upgrade;
    proxy_set_header Connection $connection_upgrade;

    tcp_nodelay on;
  }

  error_page 500 501 502 503 504 /500.html;
}
次に、作成した設定を有効にします。
$ cd /etc/nginx/sites-enabled $ sudo ln -s ../sites-available/example.com.conf -
Let's Encryptの設定
Let's Encryptの証明書を取得します。 先程設定した内容では、nginxが証明書を見つけられず起動できません。 そのため、一旦スタンドアロンで証明書を取得し、その証明書でnginxを起動します。 その次に、nginx経由で再度証明書を取得し直します。 こうすることで、cronで回して自動更新を行うことが可能となります。
$ sudo systemctl stop nginxまずスタンドアロンで証明書を取得するため、nginxを止めてポートを空けます。
$ sudo letsencrypt certonly --standalone -d example.com証明書をスタンドアロンで取得します。 取得できたらnginxを起動します。
$ sudo systemctl start nginxnginxを起動したままで証明書の更新が行えるよう、 設定を変更して再度証明書を取得します。
$ sudo letsencrypt certonly --webroot -d example.com -w /home/mastodon/live/public/ 以下の質問には、再発行を意味する2を選択します。 What would you like to do? ------------------------------------------------------------------------------- 1: Keep the existing certificate for now 2: Renew & replace the cert (limit ~5 per 7 days) ------------------------------------------------------------------------------- Select the appropriate number [1-2] then [enter] (press 'c' to cancel): 2 -
Let's Encryptの自動更新スクリプト
Let's Encryptの証明書は90日で切れます。 そのため、自動で更新スクリプトを回すことが必要です。 cronにセットするため、次のファイルを作成します。
$ sudo vi /etc/cron.weekly/letsencrypt-renew内容は以下の通りです。
#!/usr/bin/env bash
letsencrypt renew
systemctl reload nginx
このファイルに実行属性をつけ、毎週実行されるようにします。
$ sudo chmod +x /etc/cron.weekly/letsencrypt-renew $ sudo systemctl restart cron -
セットアップ
Mastodonの設定を行います。
$ sudo su - mastodon
(mastodon)$ cd ~/live
(mastodon)$ RAILS_ENV=production bundle exec rake mastodon:setup
案内にしたがって環境設定を行います。
Your instance is identified by its domain name. Changing it afterward will break things.
Domain name: example.com

Single user mode disables registrations and redirects the landing page to your public profile.
Do you want to enable single user mode? No

Are you using Docker to run Mastodon? no

PostgreSQL host: (SQLサーバのIPアドレス)
PostgreSQL port: 5432
Name of PostgreSQL database: postgres
Name of PostgreSQL user: postgres
Password of PostgreSQL user: (設定したpostgresユーザパスワード)
Database configuration works! 🎆

Redis host: localhost
Redis port: 6379
Redis password: (空のままでよい)
Redis configuration works! 🎆

Do you want to store uploaded files on the cloud? yes
Provider Minio
Minio endpoint URL: https://storage.googleapis.com
Minio bucket name: mastodon(Google Cloud Storageに作成したバケット名)
Minio access key: (Google Cloud Storageのアクセスキー)
Minio secret key: (Google Cloud Storageのシークレット)
Do you want to access the uploaded files from your own domain? no

Do you want to send e-mails from localhost? No
SMTP server: smtp.mailgun.org
SMTP port: 2525 (GCEからはデフォルトのポートが使用できません)
SMTP username: (Default SMTP Login)
SMTP password: (Default Password)
SMTP authentication: plain
SMTP OpenSSL verify mode: none
E-mail address to send e-mails "from": mastodon@example.com
Send a test e-mail with this configuration right now? Yes
Send test e-mail to: (テストに使用する自分のメールアドレス)

This configuration will be written to .env.production
Save configuration? Yes

Now that configuration is saved, the database schema must be loaded.
Prepare the database now? Yes
(中略)
Done!

The final step is compiling CSS/JS assets.
This may take a while and consume a lot of RAM.

Compile the assets now? Yes

Running `RAILS_ENV=production rails assets:precompile` ...
(中略)
Done!

All done! You can now power on the Mastodon server 🐘

Do you want to create an admin user straight away? Yes
Default type scope order, limit and offset are ignored and will be nullified
Creating scope :cache_ids. Overwriting existing method Notification.cache_ids.
Username: admin
E-mail: (使用する自分のメールアドレス)
You can login with the password: xxxxxxxxxxxxxxxxxxxxxxxxx
You can change your password once you login.
生成された~/live/.env.production ファイルには不備があるので修正します。 次の1行をファイルに書き加えます。
/home/mastodon/live/.env.production
S3_SIGNATURE_VERSION=s3 -
Systemdへサービスとして登録
/etc/systemd/system/mastodon-web.service
[Unit]
Description=mastodon-web
After=network.target

[Service]
Type=simple
User=mastodon
WorkingDirectory=/home/mastodon/live
Environment="RAILS_ENV=production"
Environment="PORT=3000"
ExecStart=/home/mastodon/.rbenv/shims/bundle exec puma -C config/puma.rb
ExecReload=/bin/kill -SIGUSR1 $MAINPID
TimeoutSec=15
Restart=always

[Install]
WantedBy=multi-user.target
/etc/systemd/system/mastodon-sidekiq.service
[Unit]
Description=mastodon-sidekiq
After=network.target

[Service]
Type=simple
User=mastodon
WorkingDirectory=/home/mastodon/live
Environment="RAILS_ENV=production"
Environment="DB_POOL=5"
ExecStart=/home/mastodon/.rbenv/shims/bundle exec sidekiq -c 5 -q default -q mailers -q pull -q push
TimeoutSec=15
Restart=always

[Install]
WantedBy=multi-user.target
/etc/systemd/system/mastodon-streaming.service
[Unit]
Description=mastodon-streaming
After=network.target

[Service]
Type=simple
User=mastodon
WorkingDirectory=/home/mastodon/live
Environment="NODE_ENV=production"
Environment="PORT=4000"
ExecStart=/usr/bin/npm run start
TimeoutSec=15
Restart=always

[Install]
WantedBy=multi-user.target
この3つのファイルをrootに上がれるアカウントに戻って作成します。
起動時に自動的に立ち上がるように登録し、起動します。
$ sudo systemctl enable /etc/systemd/system/mastodon-*.service $ sudo systemctl start mastodon-web.service mastodon-sidekiq.service mastodon-streaming.service -
接続の確認
https://example.com/ (自分のドメインに置き換えてください) にアクセスし、mastodonの画面が出れば成功です。 お疲れ様でした。
-
Google Cloud Datastore
Google Cloud Datastoreにアクセスし、エンティティを作成します。
種類のところを任意に設定し(ここではtest)、キー識別子を数値ID(自動生成)とし、プロパティにindex(整数)、path(文字列)を追加します。 このプロパティをインデックス登録するにチェック入れたままにしておきます。
適当な値を一旦入れて作り、消しておきます。
-
Google Cloud Datastore
Google Cloud Functionにアクセスし、関数を2つ作ります。
-
インデックスを作成する関数
データが保存される度に呼び出され、保存されたファイル名を保存するタスクを作ります。
トリガーを、Cloud Storageバケットにし、メディアを保存することにしたバケットを選択します。
インラインエディタで編集する場合は、保存先としてステージバケットを指定する必要があるので適宜生成しておきます。
package.json
{
  "name": "sample-cloud-storage",
  "version": "0.0.1",
  "dependencies":{
    "gcloud": "latest"
  }
}
index.js
const gcloud = require('gcloud')({ projectId: 'プロジェクトのidを入れる' }); // Instantiates a client const datastore = gcloud.datastore(); /** * Triggered from a message on a Cloud Storage bucket. * * @param {!Object} event The Cloud Functions event. * @param {!Function} The callback function. */ exports.processFile = function(event, callback) { var name = event.data.name; if(/media_attachments\/files\/\d{3}\/\d{3}\/\d{3}\/original/.test(name)){ console.log('Processing file: ' + name); const taskKey = datastore.key('test'); var indstr = name.replace(/media_attachments\/files\/(\d{3})\/(\d{3})\/(\d{3})\/original\/.*/, "$1$2$3"); var index = Number(indstr); var entry = { key: taskKey, data: [ { name: 'path', value: name }, { name: 'index', value: index } ] }; datastore.save(entry, function(err) { if(err){ console.log('err: '+name+err); } }); } callback(); }; -
httpリクエストに応じる関数
ユーザがhttpでリクエストしてきたら、メディアの一覧をhtmlにして出力する関数を作ります。
トリガーを、HTTPトリガーにします。実行する関数をhelloHttpにします。
package.json
{
  "name": "sample-http",
  "version": "0.0.1",
  "dependencies":{
    "google-cloud": "latest"
  }
}
index.js
const gcloud = require('google-cloud'); // Instantiates a client const datastore = gcloud.datastore({ projectId: 'プロジェクトのidを入れる' }); const maxnum = 100; function getList(sort, start) { var descend = true; const paths = []; var query; if(sort == 'old'){ descend = false; } if(start > 0){ if(descend){ query = datastore.createQuery('test') .filter('index', '<=', start-0) .filter('index', '>', start-maxnum-0) .order('index', { descending: true }).limit(maxnum); } else{ query = datastore.createQuery('test') .filter('index', '<', start+maxnum-0) .filter('index', '>=', start-0) .order('index').limit(maxnum); } } else{ query = datastore.createQuery('test') .order('index', { descending: descend }).limit(maxnum); } return datastore.runQuery(query) .then((results) => { const entities = results[0]; if(entities.length){ start = entities[0].index; var end = start; entities.forEach((task) => { paths.push(task.path); end = task.index; }); return [paths, start, end]; } else { return getList(sort, null); } }); } /** * Responds to any HTTP request that can provide a "message" field in the body. * * @param {!Object} req Cloud Function request context. * @param {!Object} res Cloud Function response context. */ function handleGET (req, res) { const baseUrl = 'https://mastodon.storage.googleapis.com/'; // Do something with the GET reques var start = req.query.start || 0; var sort = req.query.sort || 'new'; getList(sort, start).then((ret)=>{ var list = ret[0]; var start = ret[1]; var end = ret[2]; var backlink = 'list?sort=' + sort + '&start=' + ((sort == 'new')? start + maxnum: start - maxnum); var nextlink = 'list?sort=' + sort + '&start=' + ((sort == 'new')? end - 1: end + 1); var header = [ '<!DOCTYPE html>', '<html>', '<head>', '<meta charset="UTF-8">', '<title>mastodon cache media</title>', '<style type="text/css">', '<!--', 'html, body {', 'background-color: #000000;', 'color: #7f7f7f;', '}', '//-->', '</style>', '</head>', '<body>', '<h1>mastodonに流れてきたメディアファイル</h1>', '<p>流しそうめんにつかれたら、ザルのところでゆっくりお召し上がりください</p>', '<p><a href="'+backlink+'"><back</a> <a href="'+nextlink+'">next></a> order : <a href="list">newer</a> <a href="list?sort=old">older</a></p>' ]; var body = []; list.forEach((img) => { if(/\.mp4$/.test(img)){ body.push('<a href="'+baseUrl+img+'"><video controls src="'+baseUrl+img+'" width="300px"></a>'); } else{ body.push('<a href="'+baseUrl+img+'"><img src="'+baseUrl+img+'" style="width:300px;border:0;"></a>'); } }); var footer = [ '<p><a href="'+backlink+'"><back</a> <a href="'+nextlink+'">next></a></p>', '</body>', '</html>' ]; res.status(200).send(header.concat(body).concat(footer).join('\n')); }); } function handlePUT (req, res) { // Do something with the PUT request res.status(403).send('Forbidden!'); } /** * Responds to a GET request with "Hello World!". Forbids a PUT request. * * @example * gcloud alpha functions call helloHttp * * @param {Object} req Cloud Function request context. * @param {Object} res Cloud Function response context. */ exports.helloHttp = function helloHttp (req, res) { switch (req.method) { case 'GET': handleGET(req, res); break; case 'PUT': handlePUT(req, res); break; default: res.status(500).send({ error: 'Something blew up!' }); break; } };
-
-
稼働開始からFunction設定までに保存されたメディアのインデックスの生成
mastodonが稼働してから、storageパケットトリガを仕掛けるまでに保存されたメディアのリンクが保存されていないので、修正します。
まず、gsutilを使えるようにしておきます。認証が足りていないときは次のようにして取得しておきます。
$ gcloud auth login現時点で取得済みのリストを生成します。
$ gsutil ls gs://mastodon/media_attachments/files/*/*/*/** | grep '/original/' > list
$ sed 's|gs://mastodon/||' list > list2
リストにあって、まだインデックスに登録されていないものを登録します。
$ pip install --upgrade google-cloud-datastore
$ gcloud auth application-default login
putdata.py
#!/usr/bin/python

from google.cloud import datastore
import re

client = datastore.Client()
query = client.query(kind='test')
db = list(query.fetch())

dbfile = [];
for item in db:
    dbfile.append(item['path'])

f = open('list2')
lines = f.readlines()
f.close()

for line in lines:
    line = unicode(line.strip(), "utf-8")
    index = int(re.sub(ur'media_attachments/files/(\d{3})/(\d{3})/(\d{3})/original/.*', ur'\1\2\3', line))
    print index, line

    key = client.key('test')
    entity = datastore.Entity(key)
    entity['path'] = line
    entity['index'] = index

    if line in dbfile:
        for item in db:
            if item['path'] == line:
                if index in item and index == item['index']:
                    continue
                entity = item
                entity['index'] = index
                break

    client.put(entity)
生成したpythonファイルを実行します。
$ chmod +x putdata.py
$ ./putdata.py
メディアファイルの一覧を出力する
以上の作業により、mastodonサーバが無事構築できたと思います。 好きなイラストレータさんをいっぱいフォローしておくとGoogle Cloud Storageのバケットの madia_attachments/以下に流れてきたメディアファイルが保存されていきます。
このままでは、見るのが大変なのでwebで一覧できるように仕込みます。
メディアファイルの場所を保存するデータベースをGoogle Cloud Datastoreに作り、バケットに書き込まれるたびにGoogle Cloud Functionsを使ってデータベースに書き込みます。 もうひとつFunctionsで、httpsアクセスがある度に、htmlを生成するようにします。
HTTPトリガにした、Google Cloud Functionsのアドレスにアクセスして、メディアが一覧になれば完成です。
mastodon: https://mastodon.lithium03.info/
medialist: